Posts Tagged ‘style’
{ June 7, 2013 @ 11:15 pm }
·
{ Adult Sweaters, All Knitting Machines, Brother Knitting Machine, knitting idea, Lion Brand, Lion Brand Wool Yarn, Uncategorized, Vest }
{ Tags: Brother Bulky Machine, Brother Knitting Machine, Bulky Brother Machine, Bulky Machine Knitted Vest, clothing, Knitted, Lion Brand Knitted Vest, Lion Brand Yarn, Machine Knitted Vest, Star Knot, Star Knot Buttons, style, Wool yarn } · { }

 I started this vest over a month ago. I saw this sweater on my neighbor and told her I thought it was so cute. She gave it to me and I took pictures up close and the measurements of it once I tried it on. The shoulders were too wide so I had to do a set in armhole. I finished the fronts and back. I thought the armholes looked too large for a crocheted edge so I put a ribbed band on . Then I let it sit and when I went to do the other arm band, I had not written tension and stitches. Had to do an armband two times. Then, because I sewed the side seam up I had to attach the second band in two sections.
I did not like the way the front edges were curling and hanging so I did a 2 by 1 rib and took it off. Then I did my favorite button band and it looked too formal. I decided to try a single crochet and then a backward single crochet (crab stitch) that I have never done in all of the years I have crocheted. I like it and it did pull the edges up so they were not longer than the rest of the sweater. So, now I try it on and I don’t like the armbands with the rib. They felt too tight and they were off the edge of my shoulder so….. I took off the arm bands and did the single crochet and the crab stitch and I like the outcome. On my neighbors sweater there are two buttons at the bottom and the button holes are done on a machine. I may do that since the buttonholes were in between the ribs. Then again, I might not do any. I also made a button called the Star Knot, sort of like the monkey fist button but easier. I used cotton braiding cord. That is in the last picture. If I use buttons, these are what I will use.
The second picture shows the vest with the arm bands. The third picture is my neighbor’s sweater with the front edges straight up because I was measuring. I figured my stitch and row gauge and then went to DAK and printed out the picture so I could follow it at the machine.


{ April 13, 2013 @ 9:09 pm }
·
{ Brother Knitting Machine, Gift, Neck Warmer, Scarf, Sequins, Warm }
{ Tags: Brother Bulky Machine, Brother Knitting Machine, Bulky Brother Machine, Gift for a Knitter, Patons Yarn, scarf, style, warm } · { }

I made this scarf on the Brother Bulky because the sequins get caught in the needles on the passap . The yarn is Paton’s Lace. I used the embossed diamonds design from a baby jacket I made awhile back that was in the Machine Knitting News magazine dated September of 1998. If you click on the picture you will see that the left side of the scarf is the back side of the design. The right side is the front side of the scarf. It would not look bad with either side showing.
I thought, gee, I bet the edges won’t curl if I do the scarf in full needle rib. And they don’t. I used TD 5 on both beds. After I knit 7 rows of full needle rib, I transferred 3 stitches each side of the middle ribber stitch to the top bed. That is for the diamond. Then I transferred two more stitches on each side of those to the top bed to give room next to the ribbing. All the ribber needles that stitches were transferred are left in non working position. When you do this there is an odd amount of needles for the diamond(on the ribber) so you have to be sure your borders are the same amount of needles. You knit 2 rows, and bring one needle on each side of middle ribber needle into work(now 3 stitches) Knit 2 rows and bring up the second stitch from the middle ribber needle into work.(now 5 stitches) Knit 2 rows and then bring the third needle from the middle ribber stitch into work (now 7 stitches) . Knit two rows and start decreasing 2 stitches on the ends until one stitch left(6 rows) Repeat that for the total design. This scarf is 24 stitches wide and the width comes to not quite 5 and 1/2 half inches. The length is 60 inches. I knitted 24 diamonds. Each diamond pattern is 12 rows. I added 7 rows at the beginning and ends for the enclosed border.
Paton’s lace yarn is so soft and nice around the neck. You don’t feel the sequins either. It is hard to see the sequins in the picture but they sparkle nicely. I also used less than one skein of the yarn. There was more left if you wanted it even longer.
Here is the needle set up when you do the diamonds.
 On my scarf I have 24 main bed stitches and 23 ribber stitches. On the ribber on each end there would be six in working position and eight more needles in work on the top bed.
{ April 7, 2013 @ 9:36 pm }
·
{ Brother Knitting Machine, felted, Gift, Paton's, purses, Wool Yarn }
{ Tags: Brother Bulky Machine, Brother Knitting Machine, Bulky Brother Machine, clothing, Creative Knitting Magazine, Felted Purse, Felting, Gift Ideas, Intarsia Felted Purse, Intarsia on the Knitting machine, Paton's wool yarn, Patons Yarn, style, Wool yarn } · { }


I found this intarsia design in a magazine for hand knitters called Creative Knitting March 2005 issue. I just started the design with out planning what the purse would be like. Big mistake. I think it was more work for me that way. I started with the smaller block without black around it . I started on waste yarn and used 45 stitches. There are ten stitches for each color and one stitch of black between them. I did four rows of blocks and each color block was 12 rows with two rows of black between them. I knitted ten rows of black at the top to fold over for a magnetic closure. I wanted a bottom on it so I rehung the stitches I started with on waste yarn . I knitted 18 rows for the bottom but I also cast on 12 stitches on each side for the sides. Mistake! Should have added those stitches when I started the back and not on the bottom. I have a triangular fold on the inside to make the bottom square. No big deal though since it came out okay. I did not want to do the back in intarsia but the stitch gauge would have been way off. I was up to the third row of blocks and I forgot to knit the two rows of black between the rows of blocks!!!! Rip out time ! It was good that I ripped out because that is when I was thinking of what to do for a handle. I knitted using fairisle technique and changed colors every twelve rows. I decreased from the sides up so that the handle would not be wide. Total number of stitches for the band at the thinnest part of it was 6 for the top colors and 8 on the bottom ( two stitches for seaming) in the black. I felted a cord and put it under the flap and through the purse to gather a little to pull the opening in. I then tied the two pieces into a bow that I will sew so it stays straight. I also am putting a magnetic closure in. On the bottom I have four little silver ball “feet”. Since I am using plastic canvas on the bottom to keep it square, I may line it also. It will be for sale in my Etsy store soon.
The colors in the Intarsia are light gray, dark gray, cream and natural.
{ March 20, 2013 @ 3:21 pm }
·
{ All Knitting Machines, knitting idea, Passap Knitting Machine, Passap project, project }
{ Tags: All knitting machines, Brother Knitting Machine, cala lilly, clothing, fashion, Knitted Rose, Passap Knitted Rose, Passap Knitting Machine, Passap Rose, Ricki Mundstock, style } · { }
T

This Rose was knitted on the Passap and you can knit it on any machine. It is a pattern by Ricki Mundstock. You can find the directions at this link.
http://www.magiccables.com/patterns/passaprose.html
I used two strands of 2/24 . I think it would look nice on a headband, purse or as a pinned flower on a sweater .
The Cala Lilly is from another book and I can’t put my hands on the book to tell you who wrote the pattern. Still not organized! lol I believe there was a mistake in the directions for the top of the lily. I did not knit a stem but it would not be hard and there would be no leaves on the lily so that is less work. I am going to do the Cala Lily on the Brother in wool and felt it. I am sure it will come out really soft and pretty and no visible stitches. Stay tuned for that.(If I can find the pattern again!) lol

{ March 7, 2013 @ 1:24 pm }
·
{ knitted, Neck Warmer, Passap Knitting Machine, Passap project, Scarf }
{ Tags: clothing, Knitted, Passap Knitting Machine, passap machine, Shamrock Scarf, Shamrocks, shopping, st patrick s day, St. Patrick's Day Scarf on the Passap, St. Patricks Day, St. Patricks Day Scarf, style } · { }


I had an order for a St. Patrick’s Day Scarf that I first posted on my blog way back. The bad thing was that I cleaned up all the files on my computer and saved to disks and flash drives and I could not find it. I first made the one on the left but the customer said it was a little busy. So I went to my blog entry and zoomed in on the picture to make larger and came up with the scarf on the right. The funny thing is that I looked at the original and I don’t know how it came out looking cute(that is where the customer saw it and contacted me) It had stitches just thrown in randomly.
However, she like the second one. I used 46 stitches and 42 rows for design. I used the shamrock picture from a dishcloth design I had. I divided it into four and then added borders. I used technique 183 and one strand of each color of 2/24.I used tension dial 2.5 and I knitted 1260 rows . The scarf is 5.5 inches wide and 66 inches long.
{ February 19, 2013 @ 1:38 pm }
·
{ All Knitting Machines, Brother Knitting Machine, knitting idea, Lion Brand Wool Yarn, Passap Knitting Machine, project }
{ Tags: All knitting machines, clothing, fashion, Lynn Wohlson, Machine Knitted Leaf Trim, Studio by White, style, Trim for a Collar, Vogue Knitted Collar Trim } · { }


For years I have looked at this trim for a collar and always wanted to try it. The design first appeared in the Nihon Vogue Spring/Summer 1990 hand knitting issue. Lynn Wohlsen converted to row by row directions to knit this on the machine. The directions are in a magazine called Design Studio by White Spring and Summer 1993. In the magazine the trim is done in cotton and you can see great detail. I knitted this in wool and the first try of the three leaves is incorrect. The single leaf is the pattern I did correctly. You start on waste yarn and ravel on 6 stitches which is the base of the leaf on the right in the top picture. Then it is a series of increases and reformed stitches.. One leaf is 18 rows. On the last row there is a decrease on the edge of the leaf and then you bind off 5 stitches and end up with the original six you started with. I am going to try felting the 3 leaf sample but I think the detail will be lost. The mistake I made in the group of three is because I did not follow the directions! It says to transfer a stitch to the next one and there is an empty needle. Then you reform the stitches to the left which means they are now knitted stitches. It says to do full fashion increase from the reformed knitted stitch and put on empty needle. Well, since it is a knit stitch there is no loop to pick up so I used the purl stitch to the right to fill in the empty needle. Duh! I knitted it over and found the bar on the knit stitch and that is how you do it. You actually want it to pull in tight so that you see the detail on the edge of the leaf that is not bound off. Look closely and you can see the difference.

{ December 17, 2012 @ 12:41 am }
·
{ Brother Knitting Machine, felted, Gift, Needlefelting, Paton's, purses, Wool Yarn }
{ Tags: Brother Bulky Machine, Brother Knitting Machine, Bulky Brother Machine, Felted, Felted Purse, Felting, gift, Gift for a Knitter, Gift Ideas, metal closure, metal grommets, Needle Felting, Paton's wool yarn, Patons Yarn, style, Wool yarn } · { }
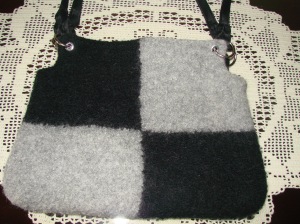
- I wanted to try my Intarsia carriage on the Bulky Brother so I made this black and gray purse. I needle felted the tree in the opposite color as the background color. I used four metal grommets to hang the purse handle. The purse handle is 24 inches long and nice for an over the shoulder purse. I used a metal closure in silver. The bottom is slightly wider than the top. When I started the bottom I did half in black and gray and the other half in gray and black since the bottom becomes the front and back. However I did not allow for this on the top. I meant to fold down the tops for the closure but then the squares would not be the same. That is why I made grommets and used a handle. I knitted a seperate piece of felted fabric for the back of the clasp so it does not show on the outside.
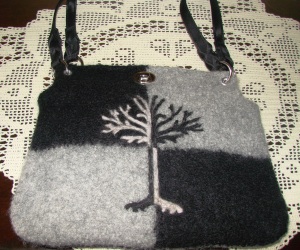 The tree roots look like Bullwinkle’s horns. LOL!!!
- It is for sale in my Etsy store. I made this over a week ago but have been so busy selling and running to the post office. Will be glad when the holidays are over. 🙂
{ December 4, 2012 @ 5:39 pm }
·
{ felted, Lion Brand, Lion Brand Wool Yarn, Warm, Wool Yarn }
{ Tags: Brother Bulky Machine, Brother Knitting Machine, Bulky Brother Machine, Felted Clogs, Felting, gift, Gift for a Knitter, Gift Ideas, Needle Felting, style, winter, Wool yarn } · { }
 And here is another pair of felted slippers for my store. lol And yes, there are pink butterflies!
{ October 6, 2012 @ 3:37 pm }
·
{ Brother Knitting Machine, felted, knitting idea, Paton's, project, Wool Yarn }
{ Tags: Brother Bulky Machine, Brother Knitting Machine, Bulky Brother Machine, Felted, Felting, gift, Gift for a Knitter, Gift Ideas, home, Knitted, Needle Felting, Paton's wool yarn, Patons Yarn, style, Wine Bottle Cover, Wine Carrier, Wine Sock, Wool yarn } · { }


I made more wine bottle covers but now I have the pattern even better. I start at the top , for example, I started with a picot edg and knitted straight for 40 rows on the main bed. Then I took off half of the stitches and placed them on the ribber bed for circular knitting. I knitted 154 rows and then took off on waste yarn. I then gathered all of the stitches and pulled in to form the bottom. At the beginning, I started with 41 stitches , did the picot edge, then increased one stitch on each end until 49 stitches. On the cream with the pink poinsettia, I did the one row on picot edge in the pink but it does not show up well. I then took a single strand of the yarn and embellished the scalloped edge to give more color. On the red poinsettia I did a scallop edge also but did not embellish with yarn since I did a row of eyelets to weave the yarn through. On the Christmas tree, the design is needle felted and I sewed on the gold garland and the lights. I had a gold yarn that I used to make the scalloped edge stand out. The grape one is an order for a lady who wanted two of them.
{ September 17, 2012 @ 4:05 am }
·
{ Brother Knitting Machine, felted, Gift, knitted, knitting idea, Needlefelting, Paton's, purses, Wool Yarn }
{ Tags: Brother Bulky Machine, Brother Knitting Machine, Bulky Brother Machine, Felted Purse, Felting, gift, Gift for a Knitter, Gift Ideas, Knitted, Needle Felting, Paton's wool yarn, shopping, style, Wool yarn } · { }
 I knitted and felted this purse using the same pattern as the one in the last posting. However, while the purse was felting my husband called me and needed me to do something. When I went to check the felting it had gone much further and it resulted in a smaller purse that I think is kind of cute. I needle felted a botanical design. I put metal grommets in purse at each end between the front and back and added a metal handle. I also purchased a purse latch for closure. The next picture shows the handle better. This will be for sale in my Etsy Store.

« Previous entries

 I started this vest over a month ago. I saw this sweater on my neighbor and told her I thought it was so cute. She gave it to me and I took pictures up close and the measurements of it once I tried it on. The shoulders were too wide so I had to do a set in armhole. I finished the fronts and back. I thought the armholes looked too large for a crocheted edge so I put a ribbed band on . Then I let it sit and when I went to do the other arm band, I had not written tension and stitches. Had to do an armband two times. Then, because I sewed the side seam up I had to attach the second band in two sections.


